Last time, we built a simple transform function in Python, but how do we know if it works? We need to build some tests to find out. I admit data engineering has be late to the practice of test development, but it’s not too hard to adopt. Let’s work through a simple data test, a row count. There are three main parts to a test: arrange, act, and assert.
Arrange
Tests are self contained. They cannot assume that things will exist in a certain state when a test is run. In the arrange section we take care of any of the steps we need to get our environment into the desired state.
In our case, in order to test our data, we need a spark connection separate from the one that will be used in our ingest class.
builder = SparkSession.builder.appName("nyctlc.TestIngest") \
        .config("spark.sql.extensions", "io.delta.sql.DeltaSparkSessionExtension") \
        .config("spark.sql.catalog.spark_catalog", "org.apache.spark.sql.delta.catalog.DeltaCatalog")

spark = configure_spark_with_delta_pip(builder).getOrCreate()
This code is similar to the private attributes in our code. This time they’re scoped to our test.
The other thing we need to do in arrange is check to see if the folder where we’re going to write the delta files already exists. If so, it needs to be removed. Otherwise, we would get an unexpected row count.
if shutil.os.path.exists(destination_folder):
   shutil.rmtree(destination_folder)
Act
The next section is where we run the code to be tested.
ingest_instance = ingest.Ingest()
ingest_instance.load_parquet_to_delta(source_folder, destination_folder)
actual = spark.read.format("delta").load(destination_folder).count()
We spin up an instance of our Ingest class, use it to load a source_folder of parquet files to a destination folder. Then we collect the row count. Notice I’m using our testing sparkSession and not the session from inside our ingest class.
Assert
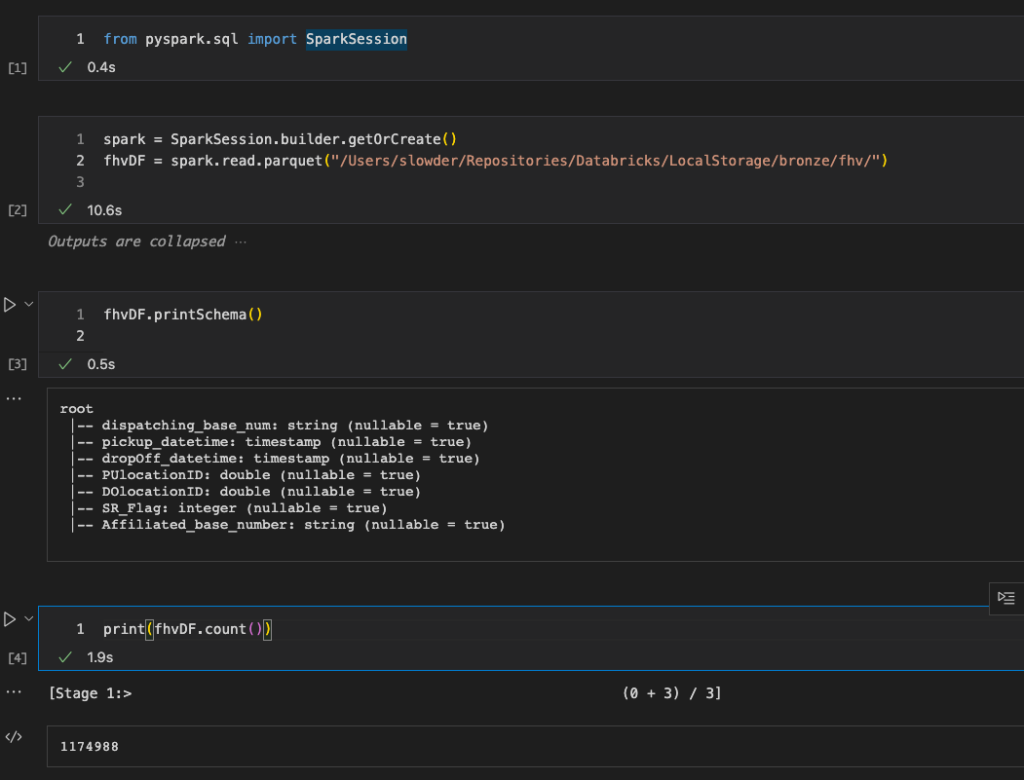
The assert section is where we compare what the code actually does against our expectation. Since we’re testing collecting a row count, we need to count the rows of a test file. In my case I’m going to use the fhv data file, so we need to open that file and count the rows. The easiest way to do that is to use spark to open that file and count the rows. So I create a notebook in my solution to do just that.

I import pyspark.sql and then set up a spark session. Using that, I read the parquet data from my fhv source file. Finally I collect the row count. Now I know how many rows I should get when I write this same data to delta format.
Cleanup
In some tests, you’ll want a fourth section for cleanup. If you load data as a part of one test, you want to clean that up before you move on to other tests. That way you don’t have any negative interactions between tests.
shutil.rmtree(destination_folder)Defining your test in PyTest
Like any python script, we start with our imports. In this case I’ll need shutil in order to cleanup our destination folder. I’ll also need delta and Pyspark.sql in order to read and write data through spark. Finally, I’ll need Pytest and my base module in order to perform the tests.
import shutil
import pytest
from delta import configure_spark_with_delta_pip
from pyspark.sql import SparkSession
from nyctlc import ingest
Next, I define a function to hold my test code. I use the naming pattern test_<base function name>_<test description>. In cases where you want to be able to run multiple versions of a single test, I recommend adding parameters to the test. In this case, we want to be able to read multiple files and verify the counts.
def test_load_parquet_to_delta_rowcount(self, source_folder, destination_folder, expected):
   #arrange, remove the destination folder if it exists.
      builder = SparkSession.builder.appName("nyctlc.TestIngest") \
      .config("spark.sql.extensions", "io.delta.sql.DeltaSparkSessionExtension") \
      .config("spark.sql.catalog.spark_catalog", "org.apache.spark.sql.delta.catalog.DeltaCatalog")

      spark = configure_spark_with_delta_pip(builder).getOrCreate()

      if shutil.os.path.exists(destination_folder):
         shutil.rmtree(destination_folder)

      #act
      ingest_instance = ingest.Ingest()
      ingest_instance.load_parquet_to_delta(source_folder, destination_folder)
      actual = spark.read.format("delta").load(destination_folder).count()

      #assert
      assert actual == expected

      #cleanup, remove the destination folder when done.
      shutil.rmtree(destination_folder)
The last thing we want to do is define some of the test cases to run. PyTest lets you define these with a decorator tag just before the test function. This is where I define a test for my fhv file and include the row count I discovered in my notebook.
@pytest.mark.parametrize("source_folder, destination_folder, expected",
   [
      ("/Users/slowder/Repositories/Databricks/LocalStorage/bronze/fhv",
      "/Users/slowder/Repositories/Databricks/LocalStorage/silver/fhv",
      1174988)])
Running our test
We need to add a couple files to our solution to configure testing. First we need a pytest.ini file. This will enable us to run tests from the command line. We need to define the naming pattern for our test files, as well as the path to use when searching for dependencies. Most all my pytest.ini files are just the two lines below.
[pytest]
pythonpath = .
python_files = test_*.py
Next, we need to configure our Visual Studio Code workspace so it can find tests and dependencies without error. Create a settings.json file in .vscode, If you don’t already have one. Then add the following attributes.
"python.testing.pytestArgs": [".", "tests"],
"python.testing.unittestEnabled": false,
"python.testing.pytestEnabled": true,
"pythonTestExplorer.testFramework": "pytest"
With these files saved, we’re ready to run our test.
PyTest from Command Line
You can open a terminal in VSC, change to the root of your solution and simply run pytest. pytest will search for any file named test_*.py and then run the test. You’ll get results that look like the following:

PyTest found one file, test_ingest.py. When it ran the test, it passed!
PyTest from Test Explorer
Click on the flask icon on the left bar of VSC

When Test Explorer opens, click Configure Python Tests.

Since we added three folders to our workspace, we have to tell Test Explorer which folder we want to test. Click the folder that contains our code. In my case it’s the folder named Databricks_IDE_Training
Next, choose pytest as your testing framework.

Next, Choose the folder that contains your tests. In my case, the “tests”

After saving, the test explorer will start searching for test_*.py files in the tests folder. Once found, it will run those tests. When it’s complete you should see results like the following.

You can see that it found our test_ingest.py file. In there it found our test_load_parquet_to_delta_rowcount. Then under that, it found our test case for the fhv data. The green checks mean pass, red x’s are fails.
I like two things about the test explorer. One, I can debug the test. If you click the Play button with a spider on it, you can step through your test (and application code). It’s useful for figuring out if the application code is wrong, or if your test is.
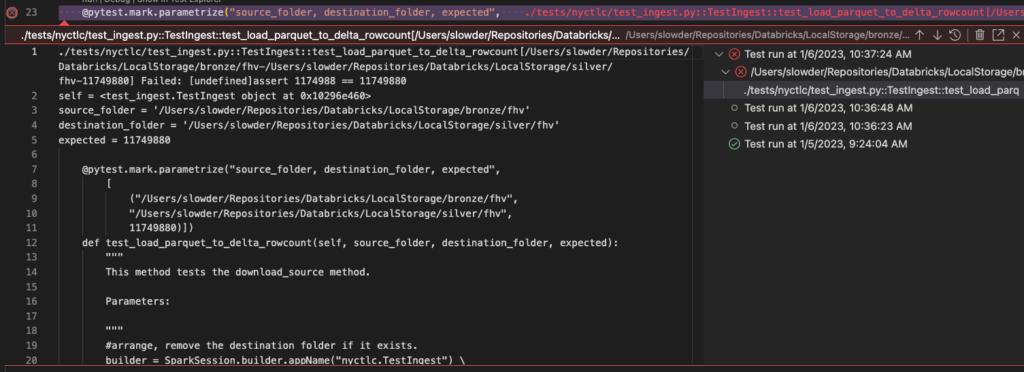
Second, I like the fact that when tests fail, you can click the failure, and it opens the test code with the error displayed in-line with the code. If I change the expected rows to 11749880, our test fails.

We can see the failure reason: “Failed: [undefined]assert 1174988 == 11749880”. The actual count is 1,174,988, and we expected 11,749,880.
Conclusion
It’s absolutely possible to develop tests as you develop your data engineering code. In my experience it adds 10-20% extra development time, but you can test your code and be more certain it works. The test we built here is a unit test. Any time we change code in load_parquet_to_delta, we would re-run this test. If the test fails, we have to determine if the code is broken or the test is. Many times you’ll learn something about an edge case that wasn’t handled in the previous step, and you have to update the test based on the new knowledge. And that’s ok.
I’d like to point out there are different types of tests that you can write. You can write Integration tests to see if your code breaks other code in the solution. You can write data quality tests, these would get run during application execution to make sure your live data follows your expectations. You could also write performance tests, in order to see when you’re ready for hardware upgrades. The opportunity for test writing is endless. That being said, don’t get caught up in trying to cover every single scenario.
Cover what you can and move on. If you discover a bug later. You can add new tests when you’re patching the bug. It’s all about improvement, not perfection.
As always, if you have any questions, please let me know.