Let’s start designing our Receptionist skill. The purpose of this skill will be to help visitors who come in for meetings alert the employee they’re meeting that they’ve arrived. We want to make this interaction as natural as possible, so we don’t have to have someone walk a new visitor through the process each time. Hopefully, this makes things easier, rather than more difficult. Our design process will begin with a dialog.
Dialog
This dialog is basically a script for a radio show. Who says what, and perhaps a few stage notes to help identify when there are some actions taken. I start with OneNote. It’s even more natural with a digital pen.

There are two actors, Alexa (A) and our User (U). The red highlight is the invocation name for our skill. Once we add this skill to our account, saying this name will tell the Alexa Skills Service we want this specific skill. These could be shared by two different skills, but there would be trouble if a user were to activate two skills with the same invocation name.
When I script out my dialog sometimes I know what slots I’m going to need. I’m highlighting my slot in green. I just have one visitor. Since a slot is also a variable, I wrap the name in angle brackets. You see above there are other variables in this process, <who> the visitor is here to see and <when> that meeting occurs. These aren’t necessarily spoken by the visitor, so I’m marking them in blue for now. Later, we may decide to make these slots as well.
This script doesn’t have to have all the variations of your script, but they should cover the golden path (best case scenario) from start to finish through your skill. With this in hand, you can branch out a bit.
Flowcharting
Starting from the golden path, what could go wrong? Could users say things in a different order? Could you get incomplete requests? Try to talk through your script with a colleague. Try to come up with as many ways of conveying the same meanings without using the same words. Write them all down and sort them by likelihood a real user would say it that way. Draw out a flowchart of how you will deal with those different scenarios of the dialog.

This process can become very tedious if you try to map out all possible variations. My plan is to implement the most likely scenarios, and then collect telemetry to identify other variations and introduce new logic as user demand proves it necessary to improve!
Interaction Model
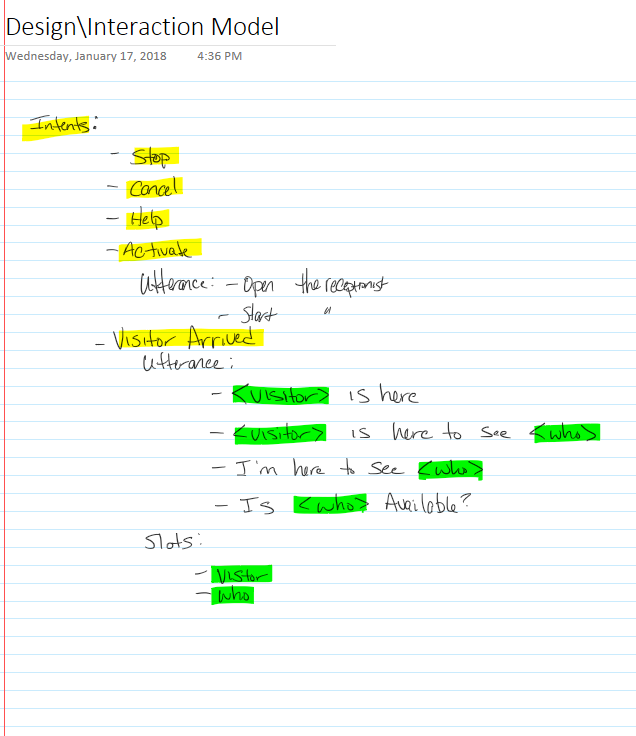
Now that we have a flowchart, developing our custom interaction model is pretty simple. Out of the box, Alexa skills have four intents: Stop, cancel, help, and activate. We only have one custom intent. We want to notify someone that a visitor has arrived. In our previous step, we identified three utterances that would trigger this intent. We want to list out our intents, utterances, and slots because that’s going to get encoded as JSON in order to configure Alexa Skills Services to direct requests to our custom service.

Conclusion
You can skip these steps, but you’ll find it a lot harder to understand how the different pieces of your solution work together without it. It took me three skills before it all sunk in because I kept trying to skip the design phase. Trust me, take time on this step early in your learning process, there’s a lot of benefits!
Next time, we’ll start out defining the interaction model in JSON, and then move into a highly simplified Azure Function in C# to show how we interact with Alexa Requests and Responses. In the meantime, if you have any questions, please send them in. I’m here to help!