
After you have your Databricks workspace, it’s time to set up your IDE. Head over to https://code.visualstudio.com/ to download the version for your operating system. It’s available for Windows, Mac, or Linux. During my most recent Databricks presentation, I was asked to point out that Visual Studio Code (VSC) is separate from Visual Studio. It began as a glorified code editor but has become much more than that.
If you already have VSC installed on your system, make sure you don’t get any errors on startup. If you do, you could have issues getting your environment set up to work with Databricks. I’ve noticed the more you do with VSC, the more likely you’ll have some error in how VSC is set up on your machine. For example, I use VSC on one of my machines to develop Powershell, Bash, C#, and Docker containers. I struggled to get that machine to reliably connect to Databricks instances and allow me to develop Python code locally.
If you have issues configuring yours, I’d look into running VSC in a Docker image. Since you can use VSC from a web browser, You can also get a docker image of VSC and run that in a container in your environment. I’m planning on looking into that myself soon to create a custom Databricks development environment others can use with a simple docker run command.
Databricks VSCode Extension
After installing VSC, open the Extensions pane, and search for “Databricks VSCode.” You should see the extension created by paqio.
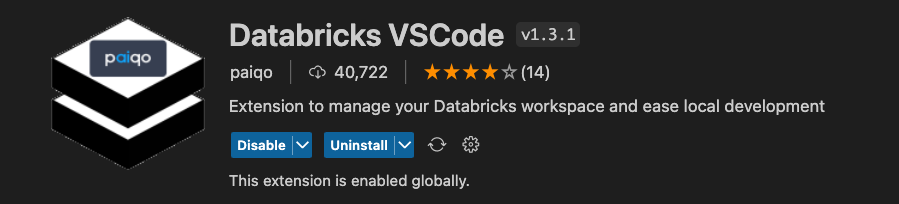
Click install, and wait a few moments for it to download. You may be prompted to reboot after the installation completes. Once you’re back in VSC, open settings, you can use CTRL + comma, or on mac, use command + comma. In the search box, type in “databricks.connections”.

Click edit in settings.json. You’ll see an empty collection named “databricks.connections”. This extension does support more than one connection, so you can add as many of the following objects to your connection as you want. Use the following template to add a connection to your extension.
{
    "apiRootUrl": "<url>",
    "displayName": "<name>",
    "localSyncFolder": "<local path>",
    "personalAccessToken": "<personal access token>"
}
You can find your URL by going to your Databricks workspace

Copy from the https:// to the .net. In my case, I want “https://adb-2337051994819825.5.azuredatabricks.net/”.
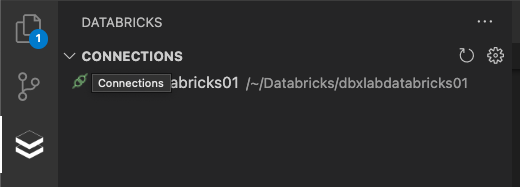
For displayName, enter any name you’ll recognize. I will often name my connections for the project(s) being developed in those workspaces. In this case, I’ll call mine dbxlabdatabricks01 to match the name I gave this workspace in the Azure portal.
For localSyncFolder, you want a path where this extension will download notebooks. You want this to be a separate folder from your repository. You also want this path to be a path that will not be synced to other machines, like your OneDrive sync folder. On Windows machines, I create c:\Databricks; for each connection’s localSyncFolder, I enter c:\Databricks\<displayNameValue>. On Mac or Linux boxes, I make a folder in my home folder called Databricks. Then for localSyncFolder I enter ~/Databricks/<displayNameValue>. For this case, my localSyncFolder would be either c:\Databricks\dbxlabsdatabricks01 in Windows or /Users/slowder/Databricks/dbxlabdatabricks01 in Mac/Linux.
You’ll need to create this workspace folder before trying to use it in later steps.
Finally, to get your personalAccessToken, click your email address in the upper-right corner of your Databricks workspace and choose user settings.

On the next screen, you can create a new token.
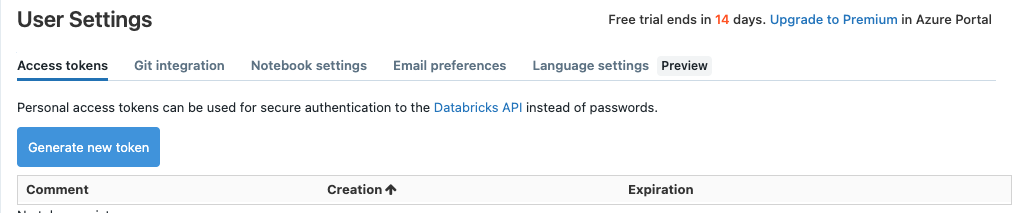
Enter a comment and the days you want the token to last. Since I’m using a 14-day trial, the trial will expire before the token. Once generated, you need to copy and paste the token value into your settings before closing out this screen. You can’t view the token again. You can only generate new tokens.
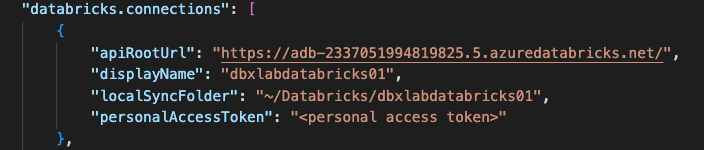
With all that entered, your settings.json should look like the one below.
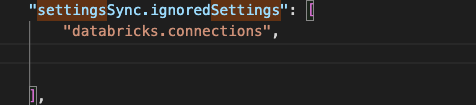
If you work on multiple machines with different file paths, you will want to set your connections in settings that do not sync between devices. To do that, search your settings.json for the “settingsSync.ignoredSettings” array. Add “databricks. connections” as an item in your array.
Now you can save your settings.json, and restart your instance of VSC. When you restart, reopen your settings.json file. You should find that the personalAccessToken attribute has been replaced with PersonalAccessTokenSecure. Your token has now been stored in a local key vault. This is another value that won’t sync properly between machines.

Tour the Databricks Extension
Now that our connection is set up open the Databricks VSC extension. Double-click on your connection name and the extension will attempt to connect to your workspace. If this fails, verify the steps above. If it’s successful, you’ll see a green icon appear to the left of your connection’s name.
The next item is your workspace. It will appear empty at first. Hit the download icon right of “Workspaces,” and you’ll initialize your local copy of your workspaces.
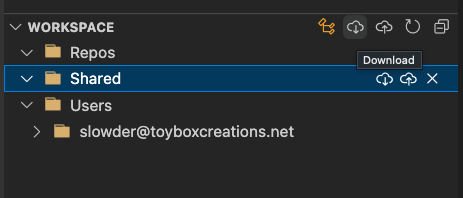
The first icon links your local copy of your workspaces to your current project’s workspace. This can be useful for accessing local copies of your workspaces and repository during development. We’ll dig into this more in later blog entries. Upload pushed your local changes to the remote workspace. And refresh will upload and download in one click. Make sure you haven’t tried editing the local copy of a notebook at the same time you’ve edited it remotely. You could lose work that way!
The clusters section shows you all the clusters you have access to in the selected workspace.
Jobs is where your ELT jobs will live after you’ve scheduled or set up a trigger for them.
DBFS is where you can see data saved to that special storage account created when you created the workspace.
“Secrets” is a local key vault inside Databricks where you can save passwords or sensitive information your workloads need.
SQL is where you will see clusters spun up specifically to support Databricks SQL workloads.
Finally, REPOS is where you can see code that you’ve pushed to your Databricks workspace via a repository. Be careful; this is another “local” repository. It’s like the local copy of your repository on your machine for local development. The difference is this copy is saved on dbfs, and is “local” to your workspace. This is not a copy of the files you would work on while developing data engineering solutions. You’d look at this copy to see if you have successfully pulled the correct version to your workspace. Trust me; this isn’t very clear. We’ll go through how to use this view later in the series.
All these sections will be empty since we’re starting from a fresh workspace.
Conclusion
You now have an IDE wired up to your Databricks workspace! In the next entry, we’ll work through creating a simple notebook locally and executing that notebook on a remote cluster in our workspace. This will mirror the Web UI workflow. It’s essential to see how to reflect that workflow before getting more advanced. If you have any questions, please let me know.