We’ve been going through a simple U-SQL script to perform some ETL processing in Azure Data Lake. Last time, we started by covering some basic syntax like variables and expressions. Now, we’ll pick up with some transformations.
SSIS v U-SQL
 In traditional data warehouse ETL, we’ve been spoiled by the ease of drag and drop in SSIS. You can generate a new process by hand pretty quickly by choosing your transformations from a menu and connecting the pipes. As I started automating those transforms, ETL patterns were defined by code instead of the GUI.
When you get started with Azure Data Lake Analytics and U-SQL, you aren’t going to find a toolbox like you did in SSIS. You’ve got to jump straight to defining your transformations in code. Many of the transformations from the toolbox are easy for us to translate to code, like a Data Conversion.
Convert.ToBoolean(myString);
Convert.ToInt(myString);
Int16.Parse(myString);
int convertedInt;
int.TryParse(myString, out convertedInt);
Any of the above would let you perform a conversion from one type to another.
Lookups, merge, union all, and split aren’t difficult to come up with their U-SQL counterparts since the language is so similar to T-SQL. Unfortunately, some transformations will require a bit more thought.
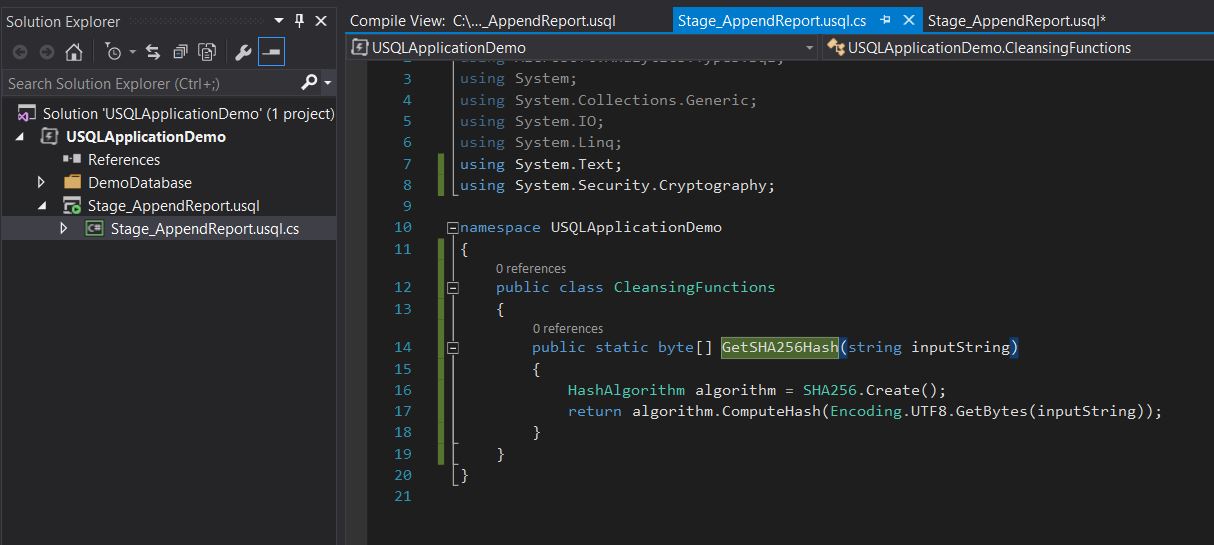
Consider the Hash Transform. We want to pass in a string, and we want to get a hash of that value back. Usually, we will use this to detect if columns have changed in our source system versus our destination system without comparing every column in the dataset. How could we implement this in U-SQL? Fortunately for us, every U-SQL script has a c# code-behind file!
In this code behind, we get access to the full power of c#. If you can write the code, you can use it to transform your data. In this example, I’ve implemented a simple hash function. I added a using reference to System.Security.Cryptography. Then I added a class to contain my hash function. Now anytime I reference this function in my U-SQL, this function will do the work.
Now, let’s see how we use that function in the script.
@CleansedData =
   SELECT
      USQLApplicationDemo.CleansingFunctions.GetSHA256Hash([Column1] + [Column2]) AS NameHash,
      [Column3]
   FROM @SourceData;
Remember that @SourceData contains a row set of the data from our input file. To call our function, we need to reference it by its fully qualified name. In this case, I’m computing the hash value of columns one and two and return the result with the column name “NameHash”.
The Purpose of U-SQL, Outputters, and a Bug!
U-SQL is not meant for ad-hoc queries. It’s meant to perform operations on files, and then write your resultset to a file. After that, you can open the file to see the result of your queries. This might change in the future, but for now, expect to have to write everything out to a file to see results.
Now that we have our cleansed data, we’re ready to write this to a file and see our results.
OUTPUT @CleansedData
   TO @OutputFile
   USING Outputters.Csv(quoting:false, outputHeader:true );
To write to a file, we use the Outputters class. Like our Extractors class, we can write out a flat text, comma delimited, or tab delimited file. Also like our Extractors, each function accepts several parameters. In our case, we don’t want double quotes in our file, and we do want a header row.
After this part of the script runs, we can go to the @OutputFile and we’ll see the result of your ETL process. This is where the bug comes in.
There are two ways you can write U-SQL scripts. You can use the Azure portal.
Or, you can use Visual Studio. To use visual studio you will need to install the Azure SDK and Azure Data Lake Tools for your version ofVisual Studio. With this setup, you can start a new U-SQL(ADLA) project in Visual Studio. There are several benefits to developing in Visual Studio. You can source control your scripts (always a plus). You can also test your scripts locally without incurring compute costs on your Azure subscription!
Notice in that second dropdown, I’ve selected (Local), and I’m referencing files on my local machine, rather than those in the data lake store! I can test my code all day long without any charges being added to my Azure account. Once I’m happy with the scripts I can change that selection from local to my Data Lake Analytics account, and my file references to the Data Lake Store. When I hit submit, the job will be sent to Azure for processing.
So, about that bug. If you use an outputter to write to a local file, and you chose outputHeader:true in your options, you still won’t get your headers in the file. Take the same script and push it to Azure, and you will get your headers. Just know it’s a bug for now. Hopefully, this will get patched soon!
Conclusion
If you’re still developing all your ETL manually in SSIS, the move to U-SQL will feel very painful and tedious. You’ll need to start thinking more about the patterns you’re developing than the implementations of those patterns. Once you get to that step, you’re ready for the big reveal: “How can I automate this ETL?” In my next entry, I’ll walk you through my meta-data driven approach to Data Lake Analytics transformations!


